Thursday, May 31, 2012

A Handpainted Sign (and Giveaway Reminder!)


This is the last day to enter Carolina Country Living's May Giveaway!  I'll draw the winner first thing Friday morning and post by 8 a.m. Eastern time.  If you haven't entered, go here right now. :)  

And for those who have entered already, thank you and good luck!

The giveaway is now closed.

**************************

A few weekends back, my son and husband went on a boys-only surf fishing trip to the Outer Banks.  With all that glorious free time, I hit yard sales, hung out with girlfriends, laid out and read, made a doily clock, and even had time to try my hand at sign painting.

I've been wanting to paint a sign for what feels like forever.  I have a ton of ideas, but for this project, I knew I wanted a simple sign to go over one of the windows in the craft room.

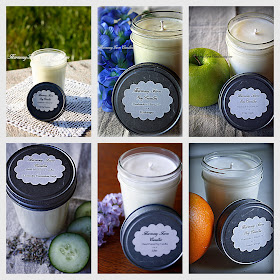
At first, I wasn't sure what the sign should say;  I wanted something with meaning and something that was unique.  I finally arrived upon painting my Etsy shop blog header since I keep all the made candles for Harmony Farm Candles in the craft room.

This is what the banner looks like:


Now, this is no tutorial since I was in a crafting groove and didn't take photos, but here's a quick rundown on how I created the sign.

First, since we have an Epson LCD projector leftover from my husband's days teaching fire safety classes, I unearthed it and projected the logo onto paper taped to a piece of wood.  I then traced the logo onto the paper.

I removed the paper from the wood, turned it over, and scribbled on the back of the paper to that I could transfer the letters and design onto the eventual sign. If you want more details on this step, Michael at Inspired By Charm shows you here.

(I didn't cut out the middle man by simply projecting the logo onto the wood because I'm a moron and didn't think about it until after the fact!  Miss Mustard Seed paints her signs this way and that's how I'll do it in the future.)

Once the logo was ready to go, I simply took a piece of pallet wood a friend gave me, which was about 5-6" tall and under 3' in length, and painted on a base coat of Annie Sloan Chalk Paint in Country Grey.  I then affixed the paper with the logo to the wood and traced it all out.

I was shocked at how easy all of this was! 

Next, it was time to start the hand-lettering.  I used craft paints in grey and brown and mixed them until I had a shade I liked.  I found dipping the craft brush into a bit of water helped the paint go on more smoothly and made it easier to manipulate.

It took about an hour to complete the lettering, then I touched up with the ASCP in areas where I colored outside of the lines.  After the paint was good and dry, which really isn't very long with chalk paint or craft paint, I distressed the entire sign with a sanding sponge.

While the sign looked reasonably nice before the distressing, I think it looks AWESOME with the faded letters.

What do you think?

The color of the sign is more yellowish here than it is in person

A closer look at the lettering...

I love how the roughness of the pallet wood comes through

And an even closer look at the yummy distressing!
This is a much more accurate representation of the sign's colors

The sign now sits in its intended spot in the craft room.  Which is still not quite ready for a reveal, but soon!


This little sign makes me so happy, I can't wait to make more this summer!

Have you, or do you, paint signs?  Share links to your projects in the comments section!

-Erin

Sharing at:


Momma Hens Coop

{Primp}


shabby creek cottage


Sunday, May 27, 2012

Hello from Busytown!


I feel like this picture from Richard Scarry's Busytown captures the essence of this past week rather well. I can really only think of one day that was spent at home; otherwise, I was on the go...a lot...like all the critters of Busytown!

Busytown fabric found on Etsy

I spent a decent chunk of time in the kitchen making candles, followed by several trips to the post office after Michael of Inspired By Charm raved on Pinterest about my Lemon Cookie candles, and orders poured in for those.  Thank you, Michael!

And then I had to deal with trying to get my car fixed after a fender-bender weekend before last.  A lady ran a red light as I was entering the intersection. Fortunately no one was hurt in the low-speed accident, and my car is still driveable, but I had to pick up the long-awaited police report, take the car to a body shop for an estimate, wait for an adjuster come out, and then play phone tag for days with the claims specialist.  The repairs will be made next week--yay for small victories!

Somewhere in there, I did manage one little around-the-house project this week in the form of planting annuals in two vintage chicken feeders to spiff up my porch.   Here's a quick look at one of them on the side porch.  That's salvia on the ends, pink and white petunias are split by a pair of Dusty Miller, and a Sweet William sits in the center. 


A close-up with a little touch of the HDR-ish effect from Picasa...love how it highlights the rust.


Among all the goings-on, the real big to-do around here was that my son finished preschool!  After two years of going to "Ms. Nancy's" three mornings a week, he graduated on Friday.

Jacob receiving his diploma from Ms. Nancy

Of course, he and his buddy Eric couldn't just stand there with their diplomas, could they?  Nope, not when diplomas can be telescopes!


My mom and sisters attended the graduation and we all posed for a picture in Nancy's lovely front yard during the reception.  The reason for the group photo was that in addition to being Jacob's preschool teacher, Nancy was my and my sisters' first grade teacher back in the day!

left to right: my mom, my youngest sister Caty, me & Jacob, Ms. Nancy, and my younger sister Sara

The busy-ness continues this weekend as we'll be spending Sunday at the Coca-Cola 600 at Charlotte Motor Speedway.  My husband received free tickets for the race, and though I'm not a fan of NASCAR, there is an IKEA only 15 minutes from the track, so we shall be making a "pit stop" there before the race. :)

Hope you all have a safe Memorial Day weekend!

Take care,
Erin


Saturday, May 19, 2012

Embroidery Hoop Doily Clock Tutorial


So, I'm still working on putting the finishing touches on the craft room.  It's taking longer than I'd like, but c'est la vie, right?

And speaking of c'est la vie, as I was getting ready to make this clock, I pulled out my Canon Rebel to photograph the steps, and it's. not. working.  Eeeeeee!!!!!

The battery's charged but the camera simply won't turn on.  I shook it gently and it sounds like there's something rattling around inside, which is obviously not good.  Bleurgh.  Luckily I still have a my little point-and-shoot, so that's the camera I used for this post (and will have to use in future posts for the foreseeable future!)

Well, I was able to cross off one of the "final touch" to-do items this afternoon when I made an embroidery hoop clock with a doily face.  I love doilies and since the craft room needs a clock, I couldn't resist the touch of granny chic.

Here's a peek of how it turned out.


If you'd like to make your own, these are the supplies you'll need:
-embroidery hoop (I used a 10" one and painted the outer hoop in Annie Sloan Chalk Paint in Old White)
-piece of drop cloth or other fabric large enough to put in hoop
-doily
-ArtMinds clock movement kit for 1/4" surfaces (from Michaels)
-ArtMinds "Designer Clock Hands" (also from Michaels; I bought these longer ones than what came with the movement kit because they fit the scale of the hoop better)
-embroidery needle
-white embroidery thread
-hot glue gun
-scissors

A shot of the movement kit and clock hands I used


Directions
1. Stretch the drop cloth over the inner hoop, then place the outer hoop on top and tighten.


2. Lay the doily on top of the drop cloth and center it as best you can.


3. Mark where the center hole in the doily lays, then with a pair of scissors, snip a hole for the movement kit, which will be inserted in a later step.  (Note: I didn't do this until after Step #4 and it was a major pain in the booty, so do it at this point and save yourself a headache.)

4. With white embroidery thread (I used 2-ply) tack down the outer edge of the doily to the drop cloth. Tie off the embroidery thread.

Sorry about the blurriness!  The zoom on the P&S (I keep wanting to type POS...hehe) doesn't focus particularly well.


5.  Insert the movement kit from the back and through the hole in the drop cloth and center of the doily.


6. Stack the clock hands in this order: hour hand, minute hand, second hand.  Secure in place with hardware included in set.


7. Carefully turn over the clock and trim the excess drop cloth, leaving enough to fold over.


8.  Take a 6-8" length of embroidery thread and thread it through the movement kit.  Hot glue the thread to the inside back of the hoop to support the movement kit.


9. Snip the drop cloth every inch or so, then fold it over and hot glue in place.


10. Insert battery into the movement kit, adjust the hands, and the clock is ready to hang!


Hope you're having a great weekend!
-Erin


Sharing at:


freckled laundry


{Primp}


shabby creek cottage


Wednesday, May 16, 2012

Another Giveaway--and It's a Good One!


Just popping in this evening to share that three candles made by yours truly are being given away at Inspired By Charm through May 22nd!

If you're not familiar with Inspired By Charm, you're in for a real treat.  Michael is a 20-something innkeeper, designer, baker, writer, quilter, painter, and all-around amazing person who's created a colorful, happy place in his delightful blog.  His creativity knows no bounds and I routinely find inspiration in his posts.

Michael's also the king of Pinterest!  If you want inspirational quotes, Michael's got 'em.  Mouth-watering desserts?  Check!  Lots of design and project ideas?  Oh, yes, my friends, there are plenty of those. 

Michael has such fabulous taste in general, that he recently surpassed the 1 million mark in Pinterest followers. And to celebrate he's holding (let's see if I can get this out in one breath!): 


Inspired By Charm's One Million Followers Eight Day Giveaway Pinterest Party Extravaganza 

Click the photo to be taken directly to the giveaways

Whew!

Today is Day Three of the extravaganza and I'm completely honored to be participating in the celebration by offering up a trio of candles (winner's choice) from Harmony Farm Candles


Now, hop on over to Inspired By Charm, check out the awesome giveaways, and congratulate Michael on reaching such a monumental milestone!

-Erin

Sunday, May 13, 2012

My Wish to Mothers on Mother's Day


{source}
 
 Keep Reading
by Rachel Macy Stafford of Hands Free Mama

For once, may those laugh lines look beautiful in the sun.
For once, may you allow yourself to come completely undone.

For once, may you note that your hair has its perks.
For once, may you feel like you’ve done enough work.

For once, may you be bored with not a damn thing to do.
For once, may you worry about no one but you.

For once, may you feel like your best IS good enough.
For once, may you know you don’t have to be so tough.

For once, may you feel like there is only one place you need to be.
For once, may your reflection hold the woman you’ve always wanted to see.

For once, may you feel like you don’t need to defend,
Your choices, your schedule, the emotions felt from within.

For once, may you decide that you are a good mother,
Breaking free from the guilt and shame that damage and smother.

For once, may you love yourself as much as they do,
You know, the adoring eyes of your children staring back at you.

Because it’s not the things you do, and it’s not the thing you say.
It’s not about bending over backwards and going out of your way.

It’s not about striving for fake perfection from head to toe.
It’s not about making homemade bouquets and moist cookie dough.

It’s about your love, bigger than a harvest moon.
It’s about your love, always showing up and never leaving too soon.

For once, may you feel the unconditional love you so freely give.
For once, may you grasp the beautiful life you’re meant to live.

And if you haven’t yet grasped it,
Keep reading,
Keep reading,
Until it finally sinks in.
 
xo,
Erin 

Saturday, May 12, 2012

Strawberry Banana Chocolate Chip Oatcake


Strawberry season: one of my favorite parts of spring. 


McAdams Farm is where we like to pick strawberries locally.  My back might ache a bit after picking several baskets, but it's worth it to have these red, ripe beauties.


Besides eating the strawberries fresh and putting more away in the freezer, I also try to incorporate them into baked goods.
Here's a simple and delicious recipe utilizing strawberries that veers from the usual fare of shortcakes, pies, and the like. The original recipe was vegan and as long as you don't use honey (but I think honey is healthiest, so that's my first choice for a natural sweetener!), this recipe can remain vegan.  For those who are gluten intolerant, it can also be gluten-free if you use GF oats.

Strawberry Banana Chocolate Chip Oatcake
Inspired by Oh She Glow's Rustic Chocolate Chip Banana Oat Cake


Mix together in a medium bowl:
2 c. oatmeal flour (process old-fashioned rolled oats in a blender or food processer)
1/2 c. old-fashioned rolled oats
1/2 c. of sucanat or brown sugar (or scant 1/2 c. of honey)
1 tsp. cinnamon
1/4 tsp. ground nutmeg
1 tsp. baking powder
1/2 tsp. salt

In a small bowl, melt a 1/3 c. of coconut oil and add:
1 very ripe banana, mashed
1-1/2 tsp. vanilla extract

Add wet ingredients into the dry, then fold in:
1/2 c. chocolate chips
1 c. sliced strawberries

Spoon batter into a greased 8" round pan and press into place. Bake at 350 degrees for 35 minutes or until toothpick inserted into center comes out clean.

Allow to cool in pan for 30 minutes before slicing. Serves 8.

This is a very old-fashioned, country kind of cake and it can honestly even double as a treat for breakfast (I see no harm whatsoever in having a bit of chocolate for breakfast!)  It's moist, dense, sweet enough without going overboard, and a very satisfying way to enjoy spring's bounty of strawberries.

Enjoy!
-Erin


Sharing at:
Funky Junk's Saturday Nite Special

{Primp}
shabby creek cottage

Tuesday, May 8, 2012

May Giveaway!


Was hoping to post this giveaway yesterday but our day turned out to be non-stop busy.  And my little buddy had to get *four* shots at his kindergarten physical so he was in need of comforting yesterday evening.  My apologies for the delay!

***********************************************************
May.

It's my favorite month of the year!

Spring is here...


The strawberries are in season...


And sprouts are coming up in the garden...


To celebrate this beautiful time of year, the happy mood it puts me in, and all the exciting happenings going on here lately, a giveaway seemed in order!

All you have to do to enter is be a follower (via Linky Followers or Google Friend Connect on the right sidebar) or email subscriber via Feedburner, and leave a comment below sharing what you like best about this time of year. This giveaway is open to readers anywhere in the world!


Enter your email address to receive new posts from Carolina Country Living in your inbox:


Delivered by FeedBurner

And now for the May Giveaway items...

A candle of your choice from Harmony Farm Candles


A copy of the premiere/summer issue of Romantic Prairie Style magazine


A trio of lavender-filled sachets handmade by me from happy, floral Japanese quilting cottons

The sachets are approximately 3-1/2" square

And this paper bunting (made during last week's crafting spree) featuring 9 pennants in cottage florals, tiny polka dots, strawberries, and stripes, strung on light blue and white baker's twine


Each pennant is approximately 3" across and they are spaced about 2" apart. The spacing can be adjusted and the length of baker's twine is more than 5 feet long.

The May Giveaway runs through May 31st and the winner will be announced June 1st! 

Happy May!
-Erin


Want to enter some other May giveaways?


A Delightsome Life


Also sharing at: