Friday, December 31, 2010

Drop Cloth Sofa Slipcover

Rene at Cottage and Vine has been hosting a drop cloth project party this week, highlighting all the wonderful ways to use this versatile and affordable fabric for purposes other than painting.   Visit her and the other partiers and get your creative juices flowing for the new year!

I seriously wish I'd known about drop cloths back in late 2008/early 2009 when I scrimped and saved, then searched (and searched...and searched some more) for simple, affordable curtains to hang on the plethora of windows in my living area and bedroom.  I probably could have gone with a muslin, but I had my heart set on linen or at least the look of it.

Target did finally offer a nice, simple linen/cotton blend that I snagged on sale for about $16 a panel, if memory serves. And you better believe I cleaned off the shelf when I had my chance! We have no visible neighbors, but still it's creepy to know someone could see straight into the house from the road. Or from a lurking position in the woods.  No, no, I'm not paranoid in the least! <rolls eyes> 

Though I missed the boat to have drop cloth curtains, once I a) learned about drop cloths on the Interweb and b) met a local seamstress and interior designer who makes slipcovers, I knew a drop cloth slipcover on my leather camelback sofa would be in my future.

Here's the sofa before:

Woo-eee!  I'd forgotten just how brassy those nailheads were.


It was originally my mom's, but she gave it to us when we moved into the house three years ago. She felt it was too bulky for her place, which is was, But it was scaled perfectly for our new living room.  Plus, it's ridiculously comfortable, accommodates my 6'2" husband nicely, and leather was ideal for a rough-housing, dirty baby boy.

The only problem with it was the unrelenting BROWN-ness of it.

Until this year, all the (inexpensive or hand-me-down) furniture in the living room was a shade of brown. Throw that on top of all the wood in the house on the walls and floors, and it was just too much of a good thing.

So, I systematically painted the side tables and hutch, one of the two rocking chairs, and found a few pieces  to introduce a cottage feel. That just left the couch.

I've coveted the IKEA Ektorp and classic Pottery Barn sofas (who hasn't though?) for years, but I couldn't possibly justify purchasing a new couch when we were in possession of a perfectly good, but BROWN, one.

Enter Kara, seamstress extraordinaire.

{P.S.--For you local folks, Kara and her business partner, Karan, own an elegant and eclectic shop called Spruce, located in Hillsborough just off I-85.  They don't have a Web site, but an antiques blogger featured the store in an October 2009 profile that provides an accurate synopsis of Karan and Kara's offerings, along with plenty of photos.}

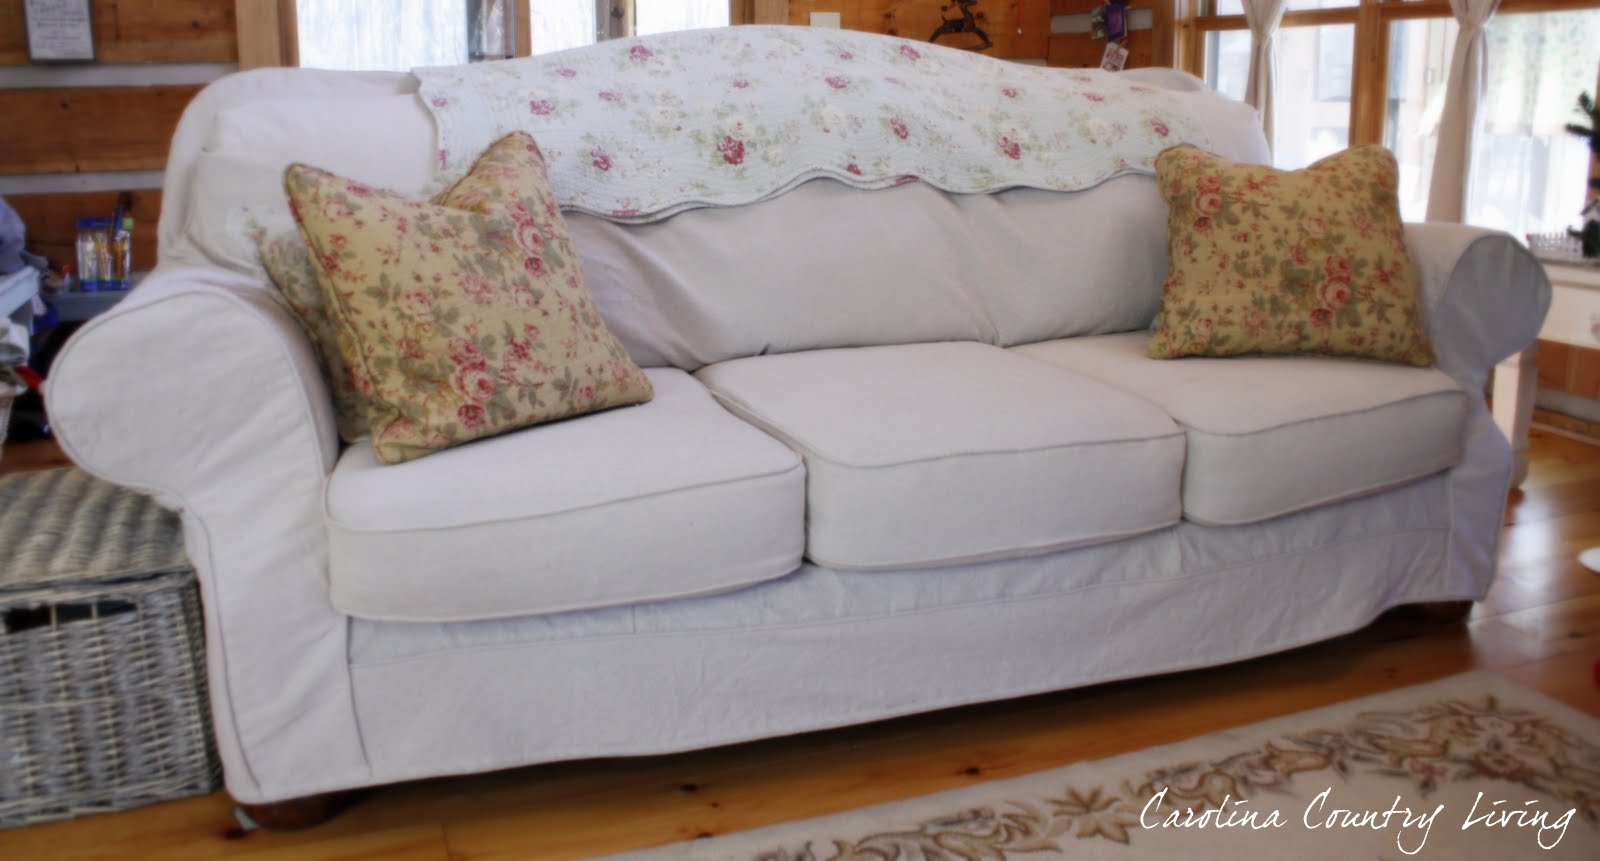
Kara worked her magic and whipped together a beauty of a slipcover.


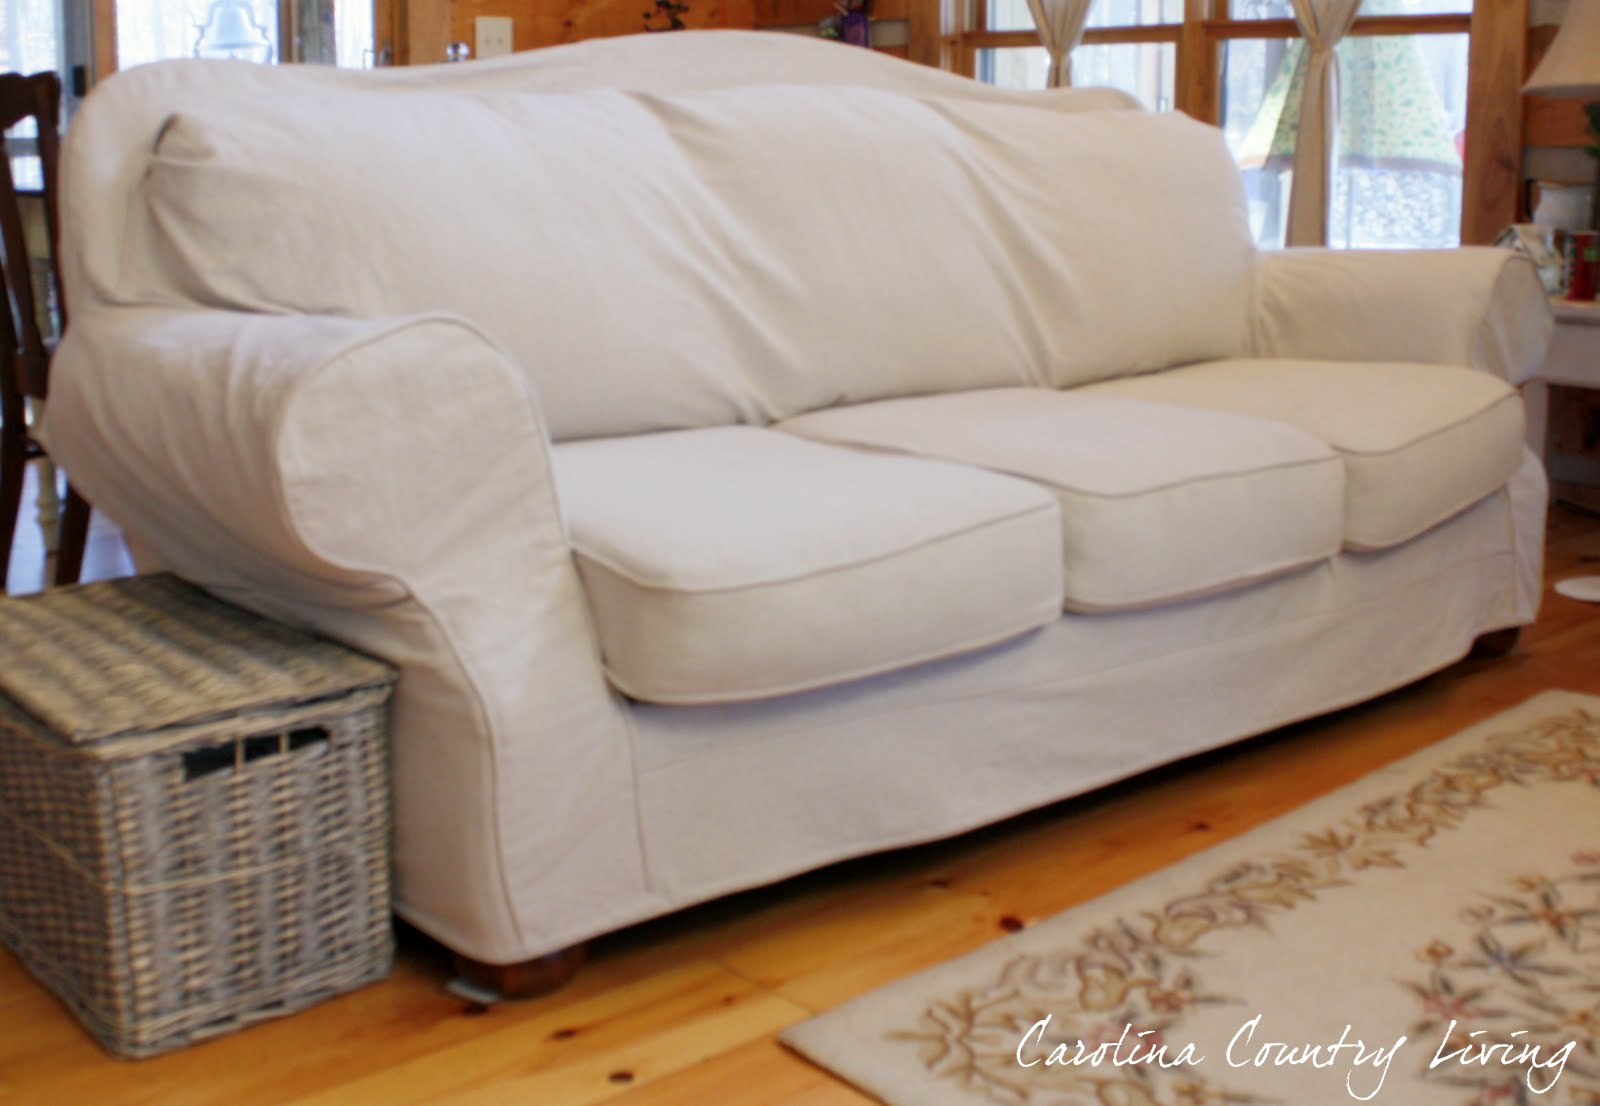
Simple, clean and exactly what this space needed!  Check out the cording details for that extra somethin' somethin':


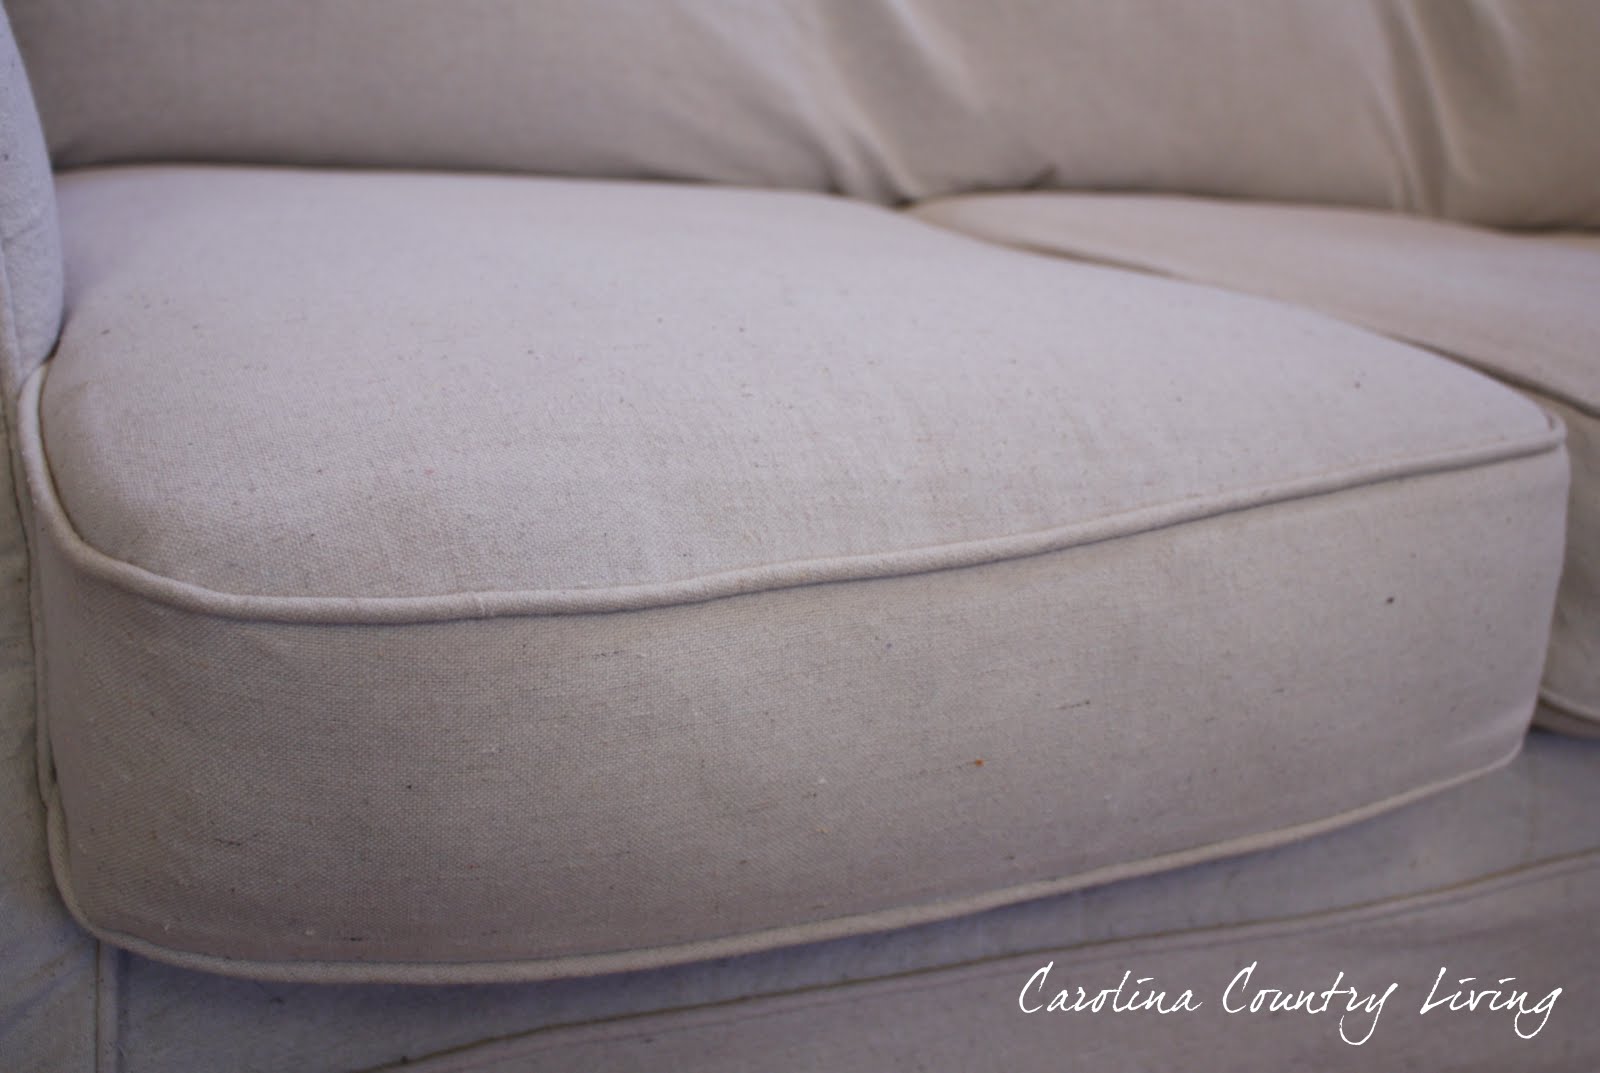
Hello, lovely nubbies.


Kara and I also made pillows and (with much patience) she taught me how to sew cording and how to sew a zipper.  See, I'm not completely allergic to sewing machines!

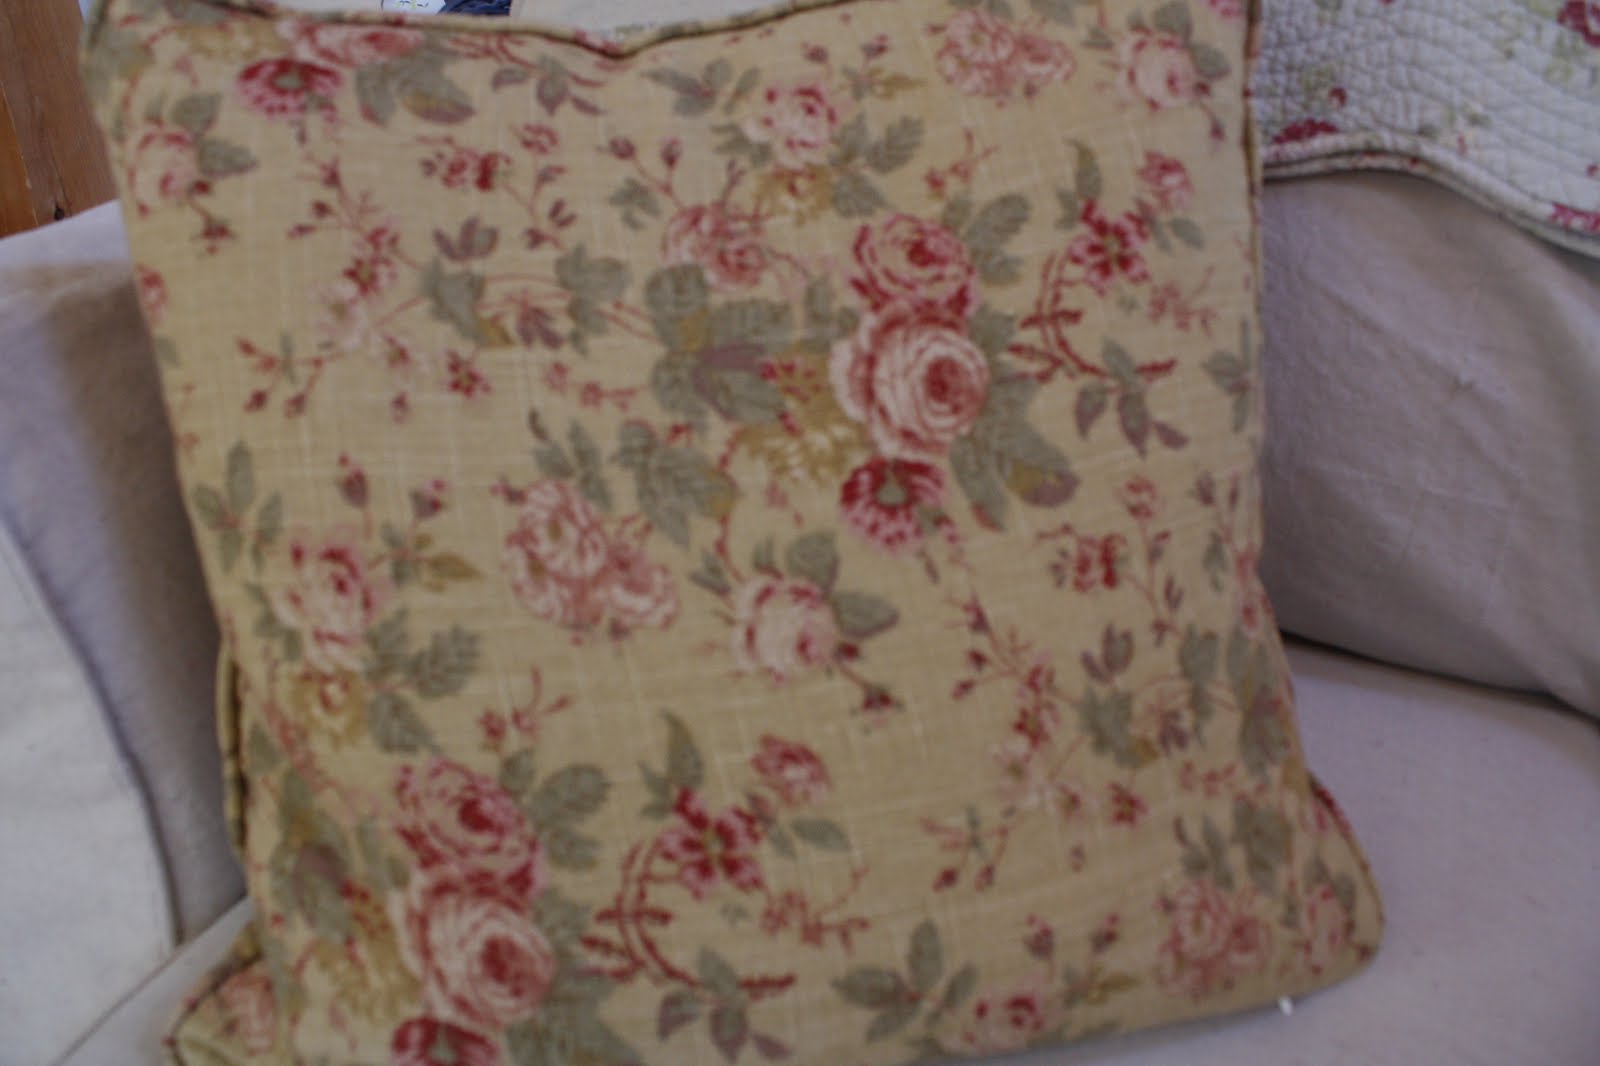
The fabric is Waverly's Rose Sonata in Tea Stain.

Okay, just one more shot of my "new" sofa that I love to doze off on, because drop cloth is infinitely warmer to lay on than leather in the wintertime...


This post brought to you by the magical, transformational abilities of a seamstress sewing with drop cloths.

This project is also linked to:


Feathered Nest Friday at French Country Cottage
Air Your Laundry Friday at Freckled Laundry


Tuesday, December 28, 2010

A New and Exciting Project for 2011

How was everyone's Christmas?

We--shock of all shockers--had a White Christmas here in North Carolina!  It was the first since the 1940s!  And that made for our *fourth* snow this month, too.  I know all you New Englanders and Midwesterners are probably scoffing, but this is highly unusual for the Tar Heel State.

Now, do I have any pictures to share of this historic occasion?

Nope.

I've been camped inside by the woodstove, feeling very unmotivated to do anything. The cold and the snow and lack of sleep leading up to Christmas have all combined to make me rather lazy and lethargic these last few days. But what are the days after Christmas for, if not for lazing about?

I feel like the funk is about to end, though, because I have something that should kick up my motivation in the coming weeks and I'm excited to share it with you all! Remember these lovely red berries in my last post?


Well, they came from the yard of my sister's new house – a 1915 one-story farmhouse!

She closed on the place a few weeks ago and I’m totally jealous for her.

The house has great bones, original doors, knobs and trim, a to-die-for country kitchen, gorgeous heart pine floors in a few rooms, a dining room with original beadboard <insert angels singing at this point>, and more. Can you understand why I’m green with envy, people??

However, the inside is ugly.as.sin.
 

A previous owner made some hideous interior paint choices along the way and the heinousness of the paint is obscuring all the wonderful period details. 

For instance, everything in the master bedroom—doors, trim *and* walls—is cornflower blue. The kitchen is another study in monochromatics—but in green.
 

It’s nothing paint and ingenuity can’t fix, though, so my sister has enlisted me to assist her in an interior facelift of her house in 2011.  I get to play Junior Interior Designer!

We have grand plans that include lots of paint (walls and floors—though not on the heart pine of course!), revamping parts of the kitchen and adding board-and-batten details, among other things.  I don't think she realizes just how many ideas I have thanks to my favorite blogs (located on the sidebar) but I'm full of 'em.  
 

And because she knows how much I like to live vicariously through others, she's also allowing me to chronicle the changes here at Carolina Country Living!
 

Stay tuned for the before pictures so you can wince at see this diamond in the rough.

This is gonna be fun!

Friday, December 24, 2010

Merry Christmas to all and to all a good night!

It's less than two hours to Christmas here and The Holiday is on the telly while I ready stockings. Besides Christmas morning itself, this is my favorite part of Christmas!

For the last few years, my husband has worked on Christmas Even from about 9 p.m. to midnight. He's a fire safety specialist at Duke University and the university's Duke Chapel always holds a midnight Christmas Eve service. It's an extremely beautiful--and exceedingly popular--service and so someone from his office has to be present to ensure the building capacity isn't exceeded.

Though you might think it would be a bummer to have him gone for a few hours on Christmas Eve, it actually works out quite well. Our son is young enough that he goes to bed before my husband heads out, and then I usually watch a movie, stuff stockings, etc. And then my husband gets an extra day off for just a few hours of work!

Since this week has been a whirlwind of last-minute shopping, candle-making, present-wrapping, cookie-baking, lunar eclipse-watching, and marmalade-cooking, I'm enjoying and relaxing in the final, blissfully quiet hours of Christmas Eve.

I also wanted to share a few more pictures of Christmas decorating that I did this week since we're down to the wire on holiday decorating posts!

After seeing so many folks at the Christmas home tours use fresh greenery, I finally got off my tush and headed to the woods for a few snips of cedar to further prettify the house.


My son and I--as part of our advent calendar activities--studded oranges with cloves this week, too. Besides pricking my thumb several times on the pointy ends of the cloves, this was a fun, old-fashioned Christmas activity to do with a preschooler. Highly recommend it!


And to top things off, my mom gave us this adorable glittery house this week.


It even has its own yard, complete with a picket fence, a snowman and a tree!  Luh-luh-love it!  This will be my first in a collection of glittery houses for next year. (Robin at Happy at Home made a gorgeous village of these lovelies and I've deemed them a "must-make" for next Christmas--how sick am I to already be deciding on crafts a year in advance?!?)

Anyway, I hope everyone reading has a wonderful Christmas with their loved ones. Thank you so much for visiting my humble blog, and for following along as I ramble, attempt to craft, and do whatever else strikes my fancy. Your comments are little gifts that buoy my spirit and I derive so much inspiration from the creativity, generosity and beauty each of you contributes to blog land. I wish you many blessings as we round out 2010 and head into the New Year!


From my home to yours!


Thursday, December 16, 2010

Christmas Home Tour


The Christmas decorating is finished at the cabin and we're partying at these awesome blogs:


Cottage and Vine's 2010 Christmas Tour of Homes 
The Shabby Chic Cottage's Holly Bloggy Christmas Home Tour
Funky Junk Interiors's Christmas 2010 Full Home Reveals


Come on in...


Thanks for stopping by!  Many wishes for a wonderful and safe Christmas!


Monday, December 13, 2010

Rag Ball Ornaments (and Semi-Tutorial)

The decorating here is coming along slowly but surely.

The tree is finished—yippee! Here’s a peek…


I also made a wreath out of my beloved upholstering webbing, but it still needs a bow of some sort to complete it. Cindy at Cottage Instincts made a cool one and I’m hoping to try my hand at it this week. 

There are a few vignettes around the house, but I haven’t had decent enough light with the overcast weather to take proper photos. I may just suck it up and post grainy pictures since we’re less than 2 weeks away from Christmas. Eeee!

However, I did manage to take a few pictures of these little gems.


Rag ball ornaments!

Tina at Rubies Place inspired me to try them and I thought they would be simple but festive embellishments for a plain garland hung on the stair rails.

Using an old stash of red ticking, my glue gun, and 3" Styrofoam balls from the Dollar Tree (two balls for a buck), I whipped together seven in less than an hour's time. 

If you're interested in making you're own, here are the basic steps:

*Cut or tear strips of fabric about 1/2" wide. I believe Tina cut her fabric with pinking shears; I chose to go for a more rustic look and tore mine. (The trick to this is to snip the fabric about an inch up and then when you yank it, it rips in a perfectly straight line!)

*Cut the strip from the rest of the fabric. Put a dab of hot glue on the ball and attach one end of the fabric strip to the ball. 

*Proceed to wrap the fabric around the ball. (I periodically changed the direction I was wrapping the fabric by folding it at a 90-degree angle and keeping my finger on the fold until I could wrap the next loop of fabric around and hold it in place. Does that make sense? Alternatively, you can twist the fabric, too.) 

*Keep wrapping until you reach the end of the strip. Then grab another strip if needed, affix it with hot glue and continue wrapping until no Styrofoam is visible. 

*Many of the fabric edges will not be laying flat at this point. Simply slide the tip of your glue gun underneath the offending edge(s), squeeze out a bit of glue, and then press the fabric into place.

Because I did this project on a bit of a whim, I didn’t have any wire handy to create loops by which to hang the balls. Instead, I improvised with paper clips.

*Bend half of the paper clip away from itself. Snip that part off with wire cutters to reveal a U-shaped piece to insert into the ball. 

Now, at this juncture, I will add that you should do as I say and not as I did. Because I was flying by the seat of my pants so enthralled in making these ornaments, I didn't think through the steps and waited to insert the paper clip hooks after applying the fabric. Try piercing through several layers of fabric with the semi-blunt ends of a paper clip. You will not find much success, my friends! I had to take a little hammer to beat insert the paper clip hooks into my rag balls. :)

*Make this easier on yourself than I did and insert the paper clips into the balls *before* you start wrapping the fabric. Adding a spot of hot glue on the paper clip ends ensures the loop won't separate from the ornament.

Whew!  It's really not hard if you learn from my mistakes--or approach the project with forethought! 

So, after that bit of finagling on my part, here are the balls happily attached to the garland. 


 That livens up the garland just enough, don't you think?

Saturday, December 11, 2010

I was featured!

The sweet and wonderful Jami at Freckled Laundry was kind enough to feature my super-simple upholstery webbing Christmas card holder at her Air Your Laundry Friday Party this week!!

freckled laundry


This was a total SQUEEE!!!! moment on my part since I'm brand-new to blogging and have never been featured anywhere.  Thank you so much, Jami!

Please visit Jami at Freckled Laundry to see her delicious French-inspired home and textile projects. You won't be disappointed by all the lovelies and you won't meet a nicer gal anywhere! :) 

Tuesday, December 7, 2010

Tannenbaum Travels

We traveled on Sunday to the western part of North Carolina to cut a fresh Christmas tree.  North Carolina is renowned for its Frasier Firs and I love these trees. They are simply the perfect Christmas tree, in my opinion.
 
We drove to Boone since it's only about 2-1/2 hours away.  It was cold here at home when we left, but it was absolutely frigid in Boone!  Their high was our low that day. 


What a view!

After grabbing a bite to eat, we visited a farm on the recommendation of my husband's co-worker. Though it was slightly off the beaten path, there were a lot of people there doing the same thing we were.

We ambled up a hill, found a lovely tree, flagged down a cutter and snapped a few pictures while waiting.


Little boy played while the guys baled the tree.

Rapscallion alert!
Then we paid for and loaded the tree, and dove as quickly as we could into the warm cab of the truck!

My son and I then slept pretty much the entire way home. (Sorry, honey!) The cold will take it right out of you! ;)

P.S.--Yesterday I read Donna at Funky Junk Interiors's excellent tutorial series on photographing with a point-and-shoot. She uses Picasa to edit her photos and so I played around with it to enhance these photos. I'm in love!  Thanks for the great info, Donna!

Saturday, December 4, 2010

Country Living Series: Heating with Wood

Though this blog is still in its infancy, I realized I had yet to actually write anything that really pertained to "country living." Now, the general plan for Carolina Country Living is to cover a hodge-podge of topics that interest me (and hopefully you), but I decided it's high time this blog lived up to its name, at least for one post!  For that reason, I've decided to start a series of periodic entries about aspects of living in the country. This is the first entry in that series.

I snuggled on the couch today, reading some lovely blogs (see my blog list for my favorites) and watching a beautiful snow fall. Though it was quite nippy outside, I was roasty-toasty thanks to a potbelly stove full of bone-dry white oak.

Let it snow, let it snow, let it snow!


Hi, I'm Erin, and I heat my house with a woodstove.  :)  Now, we're not so "country" here that heating with a woodstove is our only option. We do, in fact, have central heat and air, but we made the mistake three years ago when building this place of installing a gas furnace.

See,  this is what the living room and dining room area looks like at my house. 

Note the height of the ceiling--it extends beyond what I could even capture in the picture! We obviously didn't think through the ramifications of a 20-plus foot peak. All we saw were gorgeous timber beams. Silly us.  

Even with a several ton heating unit, the heat will run all day at 70 degrees but the air around you will feel lukewarm at best in since the hot stuff rises beyond the livable space.  And to add insult to injury, it costs an arm and a leg to keep the house tepid thanks to the ever-rising cost of liquid propane gas. 

After staying home with my baby in a chilly house for our first winter (and me turning into a miserable, cranky person who was always cold!), my husband and I decided something else had to be done; a woodstove was our answer

Ours, as you could probably tell from the photos, is a log house. The potbelly was a perfect fit for a cabin, plus we were working with a limited area of space and needed a stove that was more vertical that horizontal. 

Fits like a charm!  And even looks cute decorated for Halloween!

I won't go into the boring details of my husband building the hearth, or the installation of the stove, but suffice it to say, it was an arduous task that's ultimately been worthwhile. The stove is a simple cast-iron affair that throws some serious heat and we can now heat our entire home on wood alone. We'll flick on the heat every now and again, but there's nothing more satisfying that having a house warmed by fire, hearing the soft roar of the flames inside the fire box.

Before I start painting too romantic a picture of life with a woodstove, I do have to say heating with wood requires a willingness to do a good bit of manual labor. My husband built a simple woodshed in the spring of 2009 and we spent that month of May splitting and stacking wood we picked up for free via Craigslist ads for downed trees. We spent many a weekend in the early part of that year driving in rural parts of surrounding counties cutting up fallen trees. How's that for quality family time! :)  

This year, we were fortunate to find a huge oak that was struck by lightning on my parents' property, which is adjacent to our land. My husband chainsawed the tree apart, I carted the hunks of wood to our place, and then we split it last month. 

I'm sure some of you are thinking I'm out of my mind for doing so much just to heat my house. I may very well be, so I won't rule that out! However, I'm a pretty frugal person at heart, so apparently those sensibilities outweigh the desire to spend money on LP (which runs more than $3 a gallon these days!) or avoid hard work. And let me tell you, transporting and stacking wood is a full-body workout.

However, one aspect of living in the country, and having a country/self-sufficient mentality, means having to work to get some of the things you want.  Working in the woods (and having my sweet little boy by my side slashing limbs and exerting all that boy energy), enjoying the bounty of Mother Nature as I listen to the calls of birds and observe other woodland creatures, and using my strength and and able-bodiedness (and literally feeling it to my bones on some days) to help provide for my family's comfort are all very satisfying endeavors. But knowing I am able to heat my house through my own work? To be self-sufficient in that realm when so many of us take for granted that our homes are comfortably warm? That epitomizes life in the country to me!