
This is the last day to enter Carolina Country Living's May Giveaway! I'll draw the winner first thing Friday morning and post by 8 a.m. Eastern time. If you haven't entered, go here right now. :)
And for those who have entered already, thank you and good luck!
The giveaway is now closed.
The giveaway is now closed.
**************************
A few weekends back, my son and husband went on a boys-only surf fishing trip to the Outer Banks. With all that glorious free time, I hit yard sales, hung out with girlfriends, laid out and read, made a doily clock, and even had time to try my hand at sign painting.
I've been wanting to paint a sign for what feels like forever. I have a ton of ideas, but for this project, I knew I wanted a simple sign to go over one of the windows in the craft room.
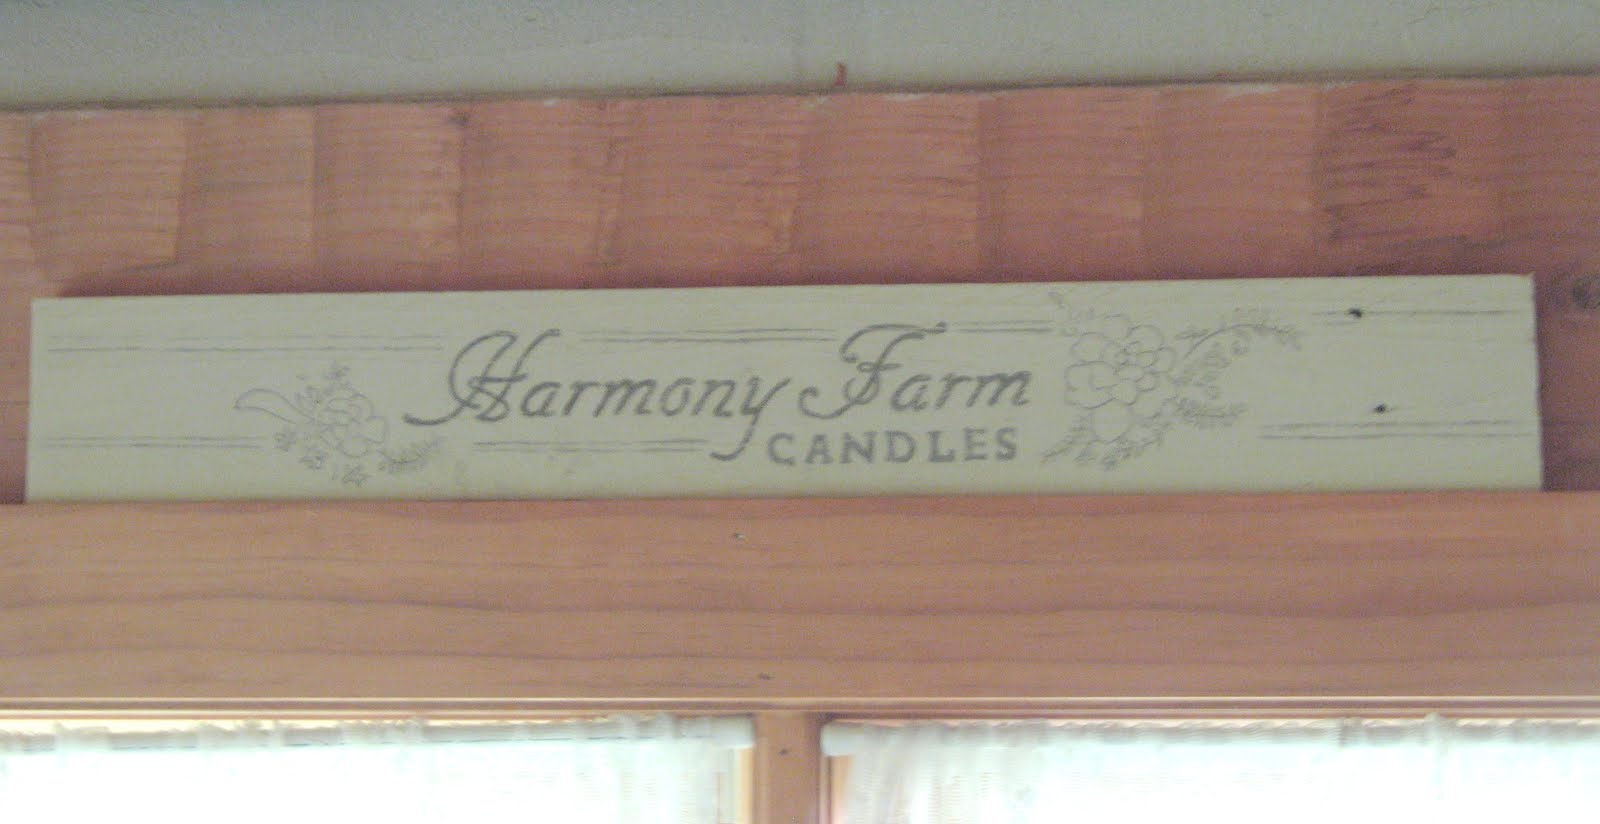
At first, I wasn't sure what the sign should say; I wanted something with meaning and something that was unique. I finally arrived upon painting my Etsy shop blog header since I keep all the made candles for Harmony Farm Candles in the craft room.
This is what the banner looks like:

Now, this is no tutorial since I was in a crafting groove and didn't take photos, but here's a quick rundown on how I created the sign.
First, since we have an Epson LCD projector leftover from my husband's days teaching fire safety classes, I unearthed it and projected the logo onto paper taped to a piece of wood. I then traced the logo onto the paper.
I removed the paper from the wood, turned it over, and scribbled on the back of the paper to that I could transfer the letters and design onto the eventual sign. If you want more details on this step, Michael at Inspired By Charm shows you here.
(I didn't cut out the middle man by simply projecting the logo onto the wood because I'm a moron and didn't think about it until after the fact! Miss Mustard Seed paints her signs this way and that's how I'll do it in the future.)
Once the logo was ready to go, I simply took a piece of pallet wood a friend gave me, which was about 5-6" tall and under 3' in length, and painted on a base coat of Annie Sloan Chalk Paint in Country Grey. I then affixed the paper with the logo to the wood and traced it all out.
I was shocked at how easy all of this was!
Next, it was time to start the hand-lettering. I used craft paints in grey and brown and mixed them until I had a shade I liked. I found dipping the craft brush into a bit of water helped the paint go on more smoothly and made it easier to manipulate.
It took about an hour to complete the lettering, then I touched up with the ASCP in areas where I colored outside of the lines. After the paint was good and dry, which really isn't very long with chalk paint or craft paint, I distressed the entire sign with a sanding sponge.
While the sign looked reasonably nice before the distressing, I think it looks AWESOME with the faded letters.
What do you think?
 |
| The color of the sign is more yellowish here than it is in person |
A closer look at the lettering...
 |
| I love how the roughness of the pallet wood comes through |
And an even closer look at the yummy distressing!
 |
| This is a much more accurate representation of the sign's colors |
The sign now sits in its intended spot in the craft room. Which is still not quite ready for a reveal, but soon!
This little sign makes me so happy, I can't wait to make more this summer!
Have you, or do you, paint signs? Share links to your projects in the comments section!
-Erin
Sharing at:


LOVE it! It looks likes an antique :)
ReplyDeletelove the sign! it's so perfect!
ReplyDeleteNICE sign! How was the race and Ikea?! I enjoy NASCAR and would love to go to a race!
ReplyDeleteLooking forward to your craft room reveal!
Thanks again for having this great giveaway.
deb
Such a cute sign...Funny enough, I just made a sign recently. They are so much fun and easy!
ReplyDeletewww.mywhiteelephant.blogspot.com/2012/05/making-signs-couple-of-times-year-city?html
Wow, a projector would sure come in handy. I haven't yet painted a sign, but I have wanted to make one for my kitchen forever. I like the idea of skipping the middle man by using the projector. Thanks for the tips and your's is really too sweet. The lettering and the color and the distressing are all just perfect. Isn't it so fun when you finally get some time to yourself and do something like this and it comes out so well! Love it!
ReplyDeleteLiz
Looks great. Thanks for the tip of dipping the brush in water.
ReplyDelete